Reviews, Security

Proton VPN: A Review

VPN software is typically used to create a secure channel between two points. Anyone who’s worked remotely (which is pretty much everyone in the last couple of years) will be familiar with them because your IT team won’t let you connect to your work network without one.

For those not in the remote office environment they offer an invaluable layer of protection when working on a public WiFi network. Most commonly in my current day-today though, they’re used by my English-speaking clients who are looking to watch TV in their native language.

For the latter purpose all VPNs are not equal. You can find a perfectly good VPN for security-only bundled with your internet security package. Kaspersky, Avast, etc. all have a VPN on their list of features. For the latter category of user though you need a paid-for VPN – and again, not all of these are set up to access the sites you are most likely interested in.

Because I am often asked by clients to recommend a VPN, I decided to try about a few of the paid ones. I tried Clear VPN first on the basis of having bought other software from them but I’m not even going to bother with a review: it didn’t do what it said on the tin and was incredibly annoying to use. I wrote to them about it it was so bad!

The next one I tried is this one: Proton VPN. Six months later I still have it installed and am using it in place of the free one. No reason particularly (I don’t watch TV!) but just because it’s a great piece of software and I like it.

When asssessing a VPN here are the four criteria I’m interested in:

  • Trust – who makes it and can I trust them?
  • Ease of use – does it annoy me or just work in an intuitive way?
  • Performance – does it do what I need it to do?
  • Price – how does it compare with others and what do I get for the money?

Why Trust Proton?

Of all the questions this one is easy to answer when it comes to Proton and the answer is definitively “yes”. Proton may not be know to the general population but it has a solid reputation for security, being one of the first (possible, only) provider to offer secure email messaging services with their flagship product ProtonMail. I have personally had an account with them for many years and cannot fault them at all. When I saw they had just launched a VPN for me there were no questions about their integrity and their ability to deliver on the security side.

Ease of Use

Selecting a server is simple and resource loads are colour coded.

Having tested various other free and paid-for VPNs I can say that Proton VPN is one of the most intuitive I have used. It’s easy to install on any platform with an interface that works nicely on any platform (not one of those where the desktop version is good but the Android version is broken, or vice versa.) I really can’t see how they could make it any simpler to use.

Essentially, once you have installed it from their site or from the relevant mobile app store (Google Play on Android or the App Store on Apple) you have to create an account. Once you have an account you fire up the app, select a country or a Profile that you’ve created to reuse in future, and that’s it. Really really simple. Then you just use your device as usual.

Performance

For regular usage (creating a secure tunnel on a public network) it’s great. For my clients with their particular needs, it also works. That means access to iPlayer and ITV. I’ve also tried it with some of the online channels (Netflix, etc.) from the iPad and yes, they work too. It’s good. You can visually see the load on the servers so, if you do run into speed issues (sometimes an issue at peak times) you can switch to one that has more resources available. Choosing one is simple: red = at capacity, orange = high traffic, and green = resources available. Not rocket science and it’s visual, which is nice.

Price

Their prices are a little lower than some of the more commonly used VPN services. Current prices (as of 28/01/2022) are below. You can save by paying up front for the year but – while you’re trying it out – you can pay a small amount more for a PAYG month-by-month subscription.

In Conclusion

I am more than happy to heartily recommend this product to my clients and to you!

If you’re interested in trying or buying, click on the link below, which will take you to the Proton VPN page.

Try or Buy Proton VPN

Still not sure? Watch my Video Review

Try or Buy Proton VPN

Question or Comments?

You can comment by using your FB profile or message me directly via my own FB page or Instagram.

Security, WordPress

Protecting Your WordPress Site

There have been a few notices out this week about security threats to WordPress sites. Hopefully your site hasn’t been affected and therefore you won’t have heard about them! (If you have been affected, you will be interested to know how to resolve any issues – so read on!)

In the News…

Popular Themes and Plugins attacked over 13 million times

On December 9th WordFence announced they had blocked 13.7 million attacks on themes and plugins within the previous 36 hours!

Four plugins in particular were affected. These were:

  • ​​Kiwi Social Share
  • ​​WordPress Automatic
  • Pinterest Automatic
  • PublishPress Capabilities

These have all since been patched so, if you are using any of these plugins and weren’t affected by the attack, make sure you update your site asap! Now, in fact.

Likewise, if you’re using a theme published by the Epsilon Framework, you should drop everything that you’re doing and updated now too.

A Major Attack on GoDaddy Customers – and Customers of High-Profile Resellers

This follows on from a huge security breach in November, affecting many sites hosted on big players that includes GoDaddy and their managed hosting resellers: TSOhost, Domain Factory, 123Reg, Heart Internet, Host Europe, and Media Temple. This particular breach affected over 1.2 million customers who had their security and secure FTP account credentials hacked. Anyone who was affected received notification from their hosts about it – and luckly, in most cases, the hosts took steps to repair the damage, regaining access to site and resetting security credentials – but who needs that kind of drama!

An XSS Vulnerability in the WooCommerce Preview E-mails Plugin

Then there was the Preview E-mails for WooCommerce vulnerability, which gave anyone with malicious intent an opportunity to inject malicious JavaScript. The flaw, called a “cross-site scripting (XSS) vulnerability” has since been patched.

Protecting your Site

It’s all very well knowing about issues like this – and it doesn’t exactly instill confidence! – but security threats and vulnerabilities are a part of website ownership, just like the common cold is a fact of daily life! The important thing is not to worry about it and to make sure you’re doing all you can to prevent your site being one of those affected. Here’s how.

Use a Secure Username and Password

Are you using “admin” for your login and your name and date-of-birth for your password? Maybe you’re using a simple password for all your online accounts. Whether it’s yes to one or all of those questions, using a strong username and password are your first line of defense. If you struggle to manage your own system for creating secure passwords, you should start using a password manager. You can use free versions of tools like LastPass or the version that comes with your internet security and antivirus software, like Kasperksy. These can be used to generate super-secure passwords (the kind you dread having to type!) and also to populate the password fields for you/ you just have to login with your master password.

Keep your Themes and Plugins Updated

Regular maintenance means keeping your website up-to-date. Most plugins and themes need updating, some more often than others. If you have a simple site without many plugins and no pagebuilders, like Elementor or BeaverBuilder, you can probably get away with automatic updates. For more complicated sites, you probably don’t want to do that because you can create new problems with plugin conflicts, so a more cautious approach is needed. Update them often. Update them now!

Have a Backup Schedule for your Site

Check with your host on the situation for backing up your site: some will require an extra charge but for many it’s a standard feature. If your site is installed using Softaculous (in cPanel) you can set a backup schedule for each WordPRess installation and choose whether this goes to your server or to an external Cloud storage account, such as Google Drive. Off-server backups are definitely worthwhile because servers can go “pop” too – and even a server company with a solid reputation can be caught out, as recently happened with the fire at the OVH data centre in Strasbourg. Oops.

Another soluton for off-site backups is a plugin like UpdraftPlus. You get the option to save backups locally or you can connect to Dropbox, Drive, etc. All well worth it in the event that you needed to roll back your site.

Use a Reputable Security Plugin

There are various ways to do this, using plugins or WordPress manager tools. You can use these to scan for threats and also to limit login attempts or mask known URLs and therefore access to plugins and folders.

Install an SSL Certificate

If your site is still using HTTP in the website address, it’s time to change it to HTTPS. There are various ways to do this and I wrote about it in this blog post about installing an SSL certificate. This is an important step so, if you’re not sure about doing this yourself, get n touch for help. Having a valid SSL certificate also means you get the little padlock symbol next to your site address in Google Chrome, so it gives peace of mind to visitors, counts towards the credibilty for your site when Google is ranking it, and also protects any private information that you or your clients transmit via your site – so it’s essential for any ecommerce transactions or when you have contact forms.

What if my site has been attacked?

If you’ve already fallen victim of one of these attacks, firstly, don’t panic! The how of doing this is worthy of an entire blog post in itself so I won’t go into details here. In short, you have various options, including restoring the site from the last good backup OR using one of the malware cleaning programs that are out there. In almost all cases (there will always be exceptions!) you will be able to get your site back.

And if you have been hacked before and haven’t worked through all the steps above, why are you still here? Make the changes outlined above, then breathe.

Websites, Security, Tutorials

Install an SSL Certificate to change your website’s address from HTTP to HTTPS

Introduction

Google announced last year that they were prioritising sites that had a verified SSL Certificate over those that didn’t. This meant, in SEO terms, that those who made the move or who were already set up that way had a slight SEO advantage (all things being equal, which of course they never are.) They also devised a way to highlight this to the viewer: you may have noticed that some sites now have a website address that starts with HTTPS and also a little padlock that says “Secure” next to them, whereas others just have an exclamation mark in a circle. If you visit a site with the padlock, you can click on it and this message is displayed:The Connection is Secure Message in Google Chrome

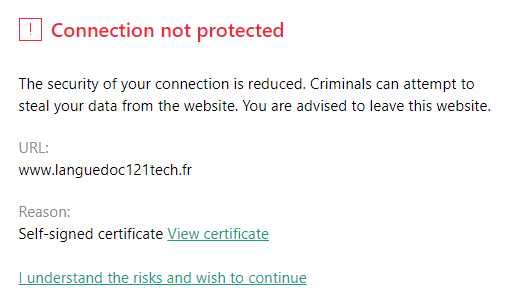
Likewise, if you click on the exclamation mark (on an unsecured site) you get this less reassuring message:

Google Chrome message: the connection to this site is not secured

What is SSL?

SSL stands for Secure Socket Layer and is a security protocol that uses a certificate chain between the server that hosts your site and a third-party who is authorised to issue certificates to verify that you are who you say you are online. When you have set up your SSL certificate and followed the steps on your server to verify the certificate, your site’s URL changes from http://yoursitename.com to https://yoursitename.com – and the address shown in Chrome is displayed with the green padlock and is prefixed with Secure |, as shown above.

Do I need an SSL certificate for my site?

I had clients ask me whether this was an essential task and for a while I said that it should be on the to-do list but wasn’t something they needed to rush towards, given the nature of their websites. For anyone trading online, selling products, exchanging personal or sensitive date, the change has been more pressing and really, if that’s the purposes of your site, you should have done this by now. But if you’re not asking clients for their personal information via the web, why the need to change?

There are two main reasons for doing this now. First, as of today, the new version of the Chrome browser marks sites that do not have an SSL certificate as “Not Secure”. Essentially nothing has changed: the site is no less secure today than it was yesterday. The point really is that it’s not as secure as sites that do have an SSL certificate. As more and more sites make this change and we come to expect to see the word “Secure” up there in the address bar, there’s an element of reassurance, of professionalism, to a site that secure over one that isn’t. The second reason is that it can also help with identifying bogus sites and tells your customers that the site they’re on is the real deal. There are some common scams that rely on users not really understanding that the site they’re on is a convincing copy of the real one, and then the scammers use that fake front-end to abuse the trust you’ve placed in the company you think you’re dealing with in order to persuade you to hand over personal details that can then be used to access your bank accounts or cards. So there are definitely benefits to you as a consumer to only interacting with sites (especially for financial transactions) with SSL certificated sites. As a business, it means your customers can come to your site and be assured that they’re not on a copy site, and that it really is you that they’re dealing with, and that any data they send will not be falling into the wrong hands.

How do I make the change to HTTPS on my site?

The steps to create an SSL certificate and install it on your site are given below.

Once you’ve installed the certificate there are three more steps:

  • Fix the links on your site so they use the new https URL (the steps here are for WordPress users, since that’s what I use for my site);
  • Create a redirect to ensure that any searches for the HTTP versions of your site are automatically routed to the new HTTPS address; and,
  • Verify your site’s certificate;

With the optional fourth step of updating your Google Webaster Console.

As you can see, before adding the security certificate, my site’s URL looks like this:

Site URL with HTTP Address

By the time we’ve worked through these steps it will look like this:

Site URL with HTTPS Address


The instructions here assume you’re using a relatively current version of CPanel to administer your site. If you’re using a site builder like Wix or SquareSpace you’ll need to check their site-specific instructions. To help you out I’ve put some links to the most common platforms at the bottom of this page. If you’re not sure about this get in touch.


Step 1: Create and Install your SSL Certificate

1. Login to CPanel and scroll to the the Security section.

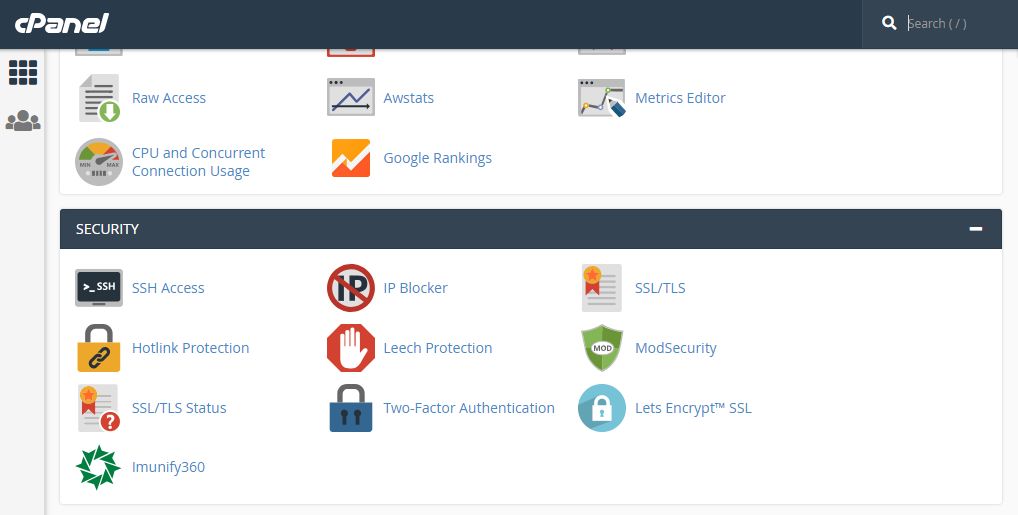
2. Click on SSL and then Install and Manage SSL for your site (HTTPS).

Menu Options in the CPanel SSL Security App

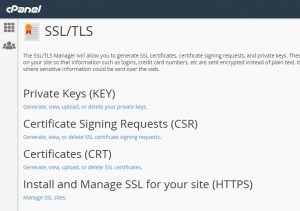
3. Click on Certificate Details.

4. Scroll down and click on Install an SSL Website.

5. Select your domain from the drop down and click Autofill by Domain.

You then get a message showing that the certificate field below is completed. That’s it!

When I did it I got a warning in Chrome that it was a self-signed certificate (as in one assigned by the same host as my server.)  Kaspersky decided to chip in too:

Kaspersky Error when clicking Self-Signed SSL Certifcate Site

This means that it has not been verified by a third-party and could, therefore, be a fake! Of course, I know it’s not but what about my customers? Let’s install it properly and verify the details. That will get rid of the warnings.

6. This time click Let’s Encrypt SSL in CPanel. 

Security Apps in CPanel

You can see from the list that I have an SSL certificate assigned to the site but that it is not installed.

List of Domains with LetsEncrypt SSL Certificates

7. Click Reinstall. You can see that the listing changes to show that the security certificate has been installed.

LetEncrypt List of Security Certificates Installed

Great. That’s the first part done. Now if you go to your browser and click refresh on your web page you should see the site listed as Secure.

Step 2: Change Site Links

On WordPress, which is what I use for my site, it’s really easy to do this.

1. Login to your Admin panel (yoursite.com/wp-admin), then click on Settings and General.

The SITE URL field in WP-ADMIN

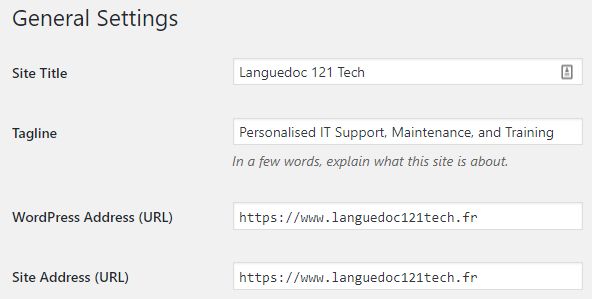
  1. Change the WordPress Address (URL) and Site Address (URL) values to https.

  2. Scroll to the bottom of the page and click Save Changes.

That’s WordPress done.

Step 3: Redirect Search Engines to your HTTPS Site

If your site has been online for a while you will (hopefully) have other sites linking to you, links from social media, etc. Without a redirect in place the the browser will just assume any pages or posts with the web address starting HTTP have disappeared, which is very bad for your SEO and very bad for your business generally! Setting what’s called a “301 redirect” will ensure that anyone coming to your site from an old link will find your new HTTPS-addressed page. You do this by accessing your site’s htaccess file.

1. Access the server and navigate to your site’s files. You can either do this with FTP or directly via CPanel.

2. Create a local copy of your site’s htaccess file.

3. Add the following code at the top of the file:

RewriteEngine on
RewriteCond %{HTTP_HOST} ^yoursite.com [NC,OR]
RewriteCond %{HTTP_HOST} ^www.yoursite.com [NC]
RewriteRule ^(.*)$ https://www.yoursite.com/$1 [L,R=301,NC]

4. In the code above, change yoursite.com to the name of your site. My htaccess file now looks like this:

RewriteEngine on
RewriteCond %{HTTP_HOST} ^languedoc121tech.fr [NC,OR]
RewriteCond %{HTTP_HOST} ^wwwlanguedoc121tech.fr [NC]
RewriteRule ^(.*)$ https://www.languedoc121tech.fr/$1 [L,R=301,NC]

You can use any text editor, such as Notepad (installed with Windows) or something more sophisticated, like Notepad++ (freeware).

5. Save and copy the updated file back to your server.

That’s it: the redirect is in place. If you click on an old link to your site, say from a Facebook post, and it should find the right page.

Step 4. Check on your SSL Certificate

This is another non-essential step, but it’s nice to verify it’s all working so I recommend you visit the SSL Labs page to check your certificate. Click on the link below, enter your site’s URL and click Submit. All being well you’ll see the certificate details listed on the page below. 

https://www.ssllabs.com/ssltest/index.html

Now for one more step, which you can skip if you’re not using Google Webmaster Tools.

Step 5: Add your HTTPS site to Google Webmaster

It’s worth having all versions of your website’s address registered in Google Webmaster because Google likes verified sites – and we all want Google to like our sites! If you haven’t already set up your site with Google Webmaster, now is the time to do it. 

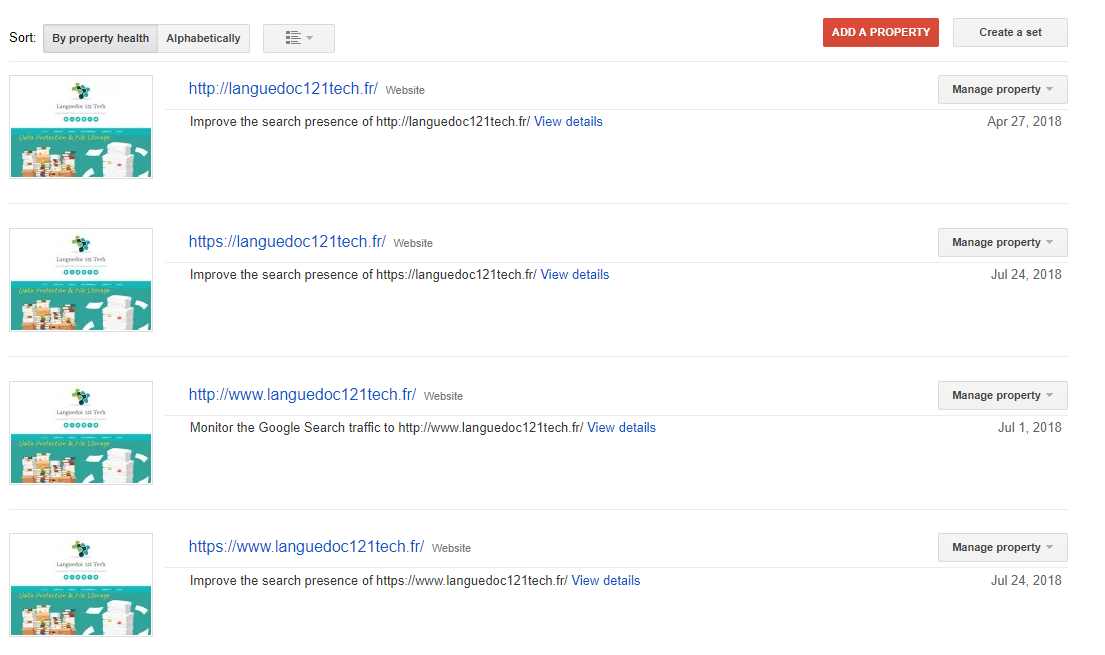
1. Sign in to your Google Webmaster account. You can see that there are already register versions of my site with and without the “www” – but nothing yet for HTTPS.

Overview of Sites Registered with Google Webmaster Console

2. Click ADD A PROPERTY.

3. Enter your site’s details, then click Add.

Add a New Site to Google Webmaster Console

4. Select the Alternate Methods tab and choose your method. I like the HTML file upload method, which involves downloading a file and putting in the /public_html file on your site’s server. If you’ve been through the verification process with other non-HTTPS versions of your site, you don’t need to copy the file again.

Verify Site with HTML File Upload in Google Webmaster Console

5. When the file is on your server, click I am Not a Robot and then Verify.

After you click Verify you’ll get a message confirming that your ownership of the site has been verified. Et voila!

6. Now do the same for the HTPPS version of your site but minus the “www” in the site address. For example, your site can be accessed using the URL www.languedoc121tech.fr or just languedoc121tech.fr so both need to be registered with the Search Console.

7. Next, click on Search Console to go back to the overview page (which lists all the domains you’ve registered using the Google Webmaster account) and check the listing. Mine looks like this, with HTTP and HTTPS versions for the variations of the domain name (with and without “www”).

Revised List with HTTPS Sites Added in Google Webmaster Console

That’s it: you’re done!

Conclusion

So there you have it. It’s a little bit of work, a little bit techy places, but not a major job and doesn’t cost a thing if you do it yourself. If a web developer tries to bill you for multiple hours or suggesting you pay for your SSL certificate, then you would be better to find another developer! Or you can contact me, of course.

If you do decide to do this yourself, please leave a comment below. Likewise, if you get stuck or have any problems.

Useful Links

Here are links to SSL installation instructions for some popular website builders.

SquareSpace

Wix

Weebly

Do you need help? Contact me now to arrange a personalised tech support or training session.


""
Security

Your Computer and GDPR: Secure File Storage and Encryption

If you’re running a business you will definitely be storing and using personal data. That means you have obligations under the new GDPR rules. In my last post, Your Website and GDPR: Privacy Policy and Consent, I described what’s needed to get the online side of your business compliant. But what about any files, documents, or invoices, or any other records you keep? This post will explain ways to ensure your customer records are secure.

Know What, Why & Where Information is Stored

When you audited your business (you’ve done that, right?) you will have created a list of the types of information you hold, why and where. In all likelihood this will include some electronic files stored on your local computer and maybe also paper copies or other paper-based records.

For example, maybe you keep it all in entry in your Outlook address book, or you might have a customer-registration form, or a database entry in a CRM application.

If you’re creating electronic copies, are they backed up anywhere? Are you backing up to a physical drive or to the cloud? Is your cloud storage secure, in the EU,  and GDPR compliant?

Any method of collecting or storing data falls under GDPR, so read on to find out ways to ensure your computer and any paper copies of files, and therefore your customers’ data, are protected and secured.

Storing Digital Records and Files

Using a Third-Party Tool

If you are using a third-party application, for example, using an application like Wave or Freshbooks to generate and track your invoices, you will have to check on the GDPR compliance policy of that company. Most companies are busy working towards compliance but the onus is on you to check. Because any software like that will require you have an account with a secure login process, as long as the company says they’re compliant, you’re probably good to go: just make sure your password is as secure as it can be. If you’re not using one of the many password manager tools, now would be a good time to start (although they come with their own risks, of course!)

If you’re not sure, get in touch. Most software providers are fully aware of the demands being placed by the new GDPR rules and are keen not to lose business due to non-compliance.

On your Computer

If you are keep data locally, on your PC, you need to know where this is so you can find it to provide it on customer request and/or remove it. And it needs to be secure. The question to ask yourself is this: if someone steals my computer, my phone, my iPad (or whatever piece of tech you store your files on) can the personal data of my customers be accessed? If the answer is yes, there are a few simple things you can do to lock that information down.

Encrypt Your Computer, Files and/or Folders

First, you need to ensure that your PC and the files you stored there are encrypted, which is just a fancy word for password-protected.

You want to make sure your PC is locked. Think about whether someone who finds or steals your PC could open it and start working without having to jump through any security hoops. Make sure you have a login password, pin, or fingerprint scan set up to enable access your device.

Then, make sure you have an encrypted folder specifically for any files that include customer data. There are several ways to do this: you can pay for software, you can use a ZIP or other password-protected archives in place of folders  for customer files (a bit clunky, but it would do the job), or – chances are you can use software that is already installed on your computer, either bundled with the OS or as part of your internet security package. If you’re running paid-for software from one of the main internet security companies it’what’s available. For example, Kaspersky Total Internet Security provides a tool called Secure Folders and Comodo Internet Security has Protected Data Folders. No need to spend any more money. Bonus.

Secure your Backups

Backing up to The Cloud

If you’re backing up to The Cloud (think Google Drive or Dropbox) you need to ensure that their service is secure and GDPR compliant. More and more of us are using cloud storage these days, but as that will involve passing digital information from your computer to the cloud how secure is that really? Is encryption used when the files are transferred? Is it a US or EU based company? What happens in the event of a data breach? Where the data is stored?

And it’s not so simple as you think: lots of us use Google Drive nowadays and while it’s really easy to backup your files using their Backup and Sync tool, which is fine for your personal files, unfortunately (at least at the time of writing) it’s not a workable option for your customer files. Why? Because Google have said that unless you’re paying for the service as part of a My Business account, Google Drive (personal) is not GDPR compliant.

Backing up to an External Drive

If you’re backing up to an external drive, you need to make sure that access is encrypted. As with your physical computer, ask whether someone who took your drive could open it and access your files. Protected your device and your files in the same way you would on your computer.

Secure your Hard Copies

So much for the paperless office. We all end up with paper copies of some sort – and some of us prefer to keep records that way. If you are keeping records on paper, the question re security goes back to the what happens if someone accesses your files. In the same way that you are responsible for protecting electronic files, you’re required to ensure paper files are secure. With paper files that means keeping them under lock and key. That means getting a lockable draw or filing cabinet – ideally something fireproof, just to be sure – and locking them away.

And Last Steps…

Lastly, document it all. You should have all this in a single file as the result of your audit. If not, now would be a good time to do it.


Image credit: iStock.com/drogatnev

Disclaimer: This information is intended as guidance only. It is not a substitute for legal advice and is based on personal research conducted by the of the author. Ensuring your business is GDPR compliant is the responsibility of your Data Controller. 

If you need help with this or any other aspect of your home or business IT, contact me to arrange a free consultation.

Zeros and Ones with a Padlock and text " Are You GDPR Ready?"
Security

Are You GDPR Ready?

What is GDPR?

From May 28th the new general data protection regulations (GDPR), Regulation (EU) 2016/679, come into effect. These will give individuals far greater control over their personal data, with the scope of what constitutes personal data greatly enhanced to include:

“any information relating to an identified or identifiable natural person (‘data subject’); an identifiable natural person is one who can be identified, directly or indirectly, in particular by reference to an identifier such as a name, an identification number, location data, an online identifier or to one or more factors specific to the physical, physiological, genetic, mental, economic, cultural or social identity of that natural person;”

For businesses in or trading within the EU, this means much tighter controls need to be in place to ensure that the terms of the GDPR are not being breached. The full text of the regulations is available online from the GDPR Info website and is required reading for anyone who is responsible for data within a company of any size and all sole traders.

For small businesses, this may seem daunting, but there are a few simple things you can do.

7 Steps to Get Ready for GDPR

  1. Audit all the personal data you use or hold. This means information for customers, visitors to your website, newsletter or mailing list subscribers. This means data you hold or collect both on and offline.
  2. Publish a Privacy Policy on your site. This must be written in plain and readable language and clearly state what information you use and hold, why it is used, where it is held (if it is stored), and how individuals can request details about their personal data and also request its removal.
  3. Implement an Opt-In policy. For your website, this means you need to ask every visitor to your site whether they are happy with your Privacy Policy before they access the site and any information is transmitted.
    For any mailing list subscribers, you need to contact them asking them to confirm that they are accept your privacy policy and wish to continue their subscription.
    And any forms on your site need a consent button, so people know what information you will hold and an opt-in for any related mailing lists.
  4. Move your site from HTTP to HTTPS. This is vitally important if you run an online store or accept credit card details. It’s less of a priority for non-commercial sites but does give your visitors a level of reassurance and also has advantages for your site’s SEO.
  5. Update your Terms & Conditions. These must specify what data you hold, why, where, and how customers can find out about this. Communicate any changes to an existing policy to your customers.
  6. Document your Data Retention Policy. Know what you are storing where so that if someone asks what you are holding or asks for information to be deleted, you can easily find it and comply.
  7. Ensure all Personal Data you hold is stored securely. This means checking that any cloud storage you use is GDPR compliant (for example, Google Drive is not unless you have a My Business account), and any files that you keep in your home or on your laptop are secured, either with a physical key or with a digital one.

Now read part 2 in this series.

In this next post find out how to makes sure your website is GDPR ready by publishing your privacy policy and obtaining consent from new visitors.


Image credit: iStock.com/Matthew de Lange

Do you need help? Contact me now to arrange a personalised tech support or training session.